
System & Level Design
This page is dedicated to projects created by myself or with other people. The main goal is to expose technical knowledge in System and Level Design.
System Design
Telekinetic-Warrior: Turn-based class
For my degree project at FutureGames, I spent 2 months in Unreal Engine 5 creating a class for a turn-based game using blueprints. It uses a combination of Warrior and Telekinetic abilities, inspired by Star Wars Jedi’s combat style.
I decided to replicate Divinity: Original Sin’s systems for Action Points, free movement and abilities cooldown.
I started by writing down how the system would work and what abilities I wanted to implement, but, once I started the implementation process in Unreal, I realized there were many more features I wanted to create; so, as the implementation of the planned features was moving smoothly, I decided to work on anything else that came to mind like status effects and enemies behaviours.
Overview:
To showcase the system, I created a simple arena with enemy waves. When all enemies are eliminated, players are given a level up that gives them 2 new abilities and some points to spend to increase their stats. Then a new wave of stronger enemies is spawned.
Every action taken by the player consumes Action Points (AP), which are then replenished at the start of a new turn; this includes movement and abilities.
Enemies work in a similar way, where they use AP to move towards the player and attack them.
Both Player and enemies have stats that increase after each level. Players can choose what stat to increase, while for every enemy a stat is increased randomly.
Both Player and enemies, when attacking, have to roll a d20 and surpass the target’s Armour Class (determined by Dexterity) in order to hit. This chance can be increased by levelling up the correct stat.
For every point over 10 of every stat, the modifier increases by 1:
- Strength modifier increases damage dealt by physical attacks and their chance to hit;
- Mind modifier does the same, but for telekinetic abilities;
- Dexterity modifier increases the chance of evading an attack;
- Constitution modifier increases Health.
During development, I also implemented some quality of life features such as rotating the camera by pressing the middle mouse button and moving the mouse to better target enemies and zoom in and out with the mouse scroll.
Abilities:
There’s a total of 15 abilities, of which 6 are melee and 9 use telekinesis; all abilities have an AP cost, a range and a cooldown. Some also have an area of effect, allowing the player to target multiple enemies with the same ability in a single attack.
There’s also a special ability that increases the range of some abilities, following the idea of the telekinetic powers; for example, the 360° physical attack has a range of 200 units, which increases when empowered. The player has 3 empowering points at their disposal that are replenished after every level.
“360° attack” from the “Abilities Manager” blueprint:
Effects:
Some abilities can also affect enemies with negative effects, like Debilitation (makes it harder to hit the player) Disarm (have to reach for their weapon before attacking, using AP) and Prone (forces them to use AP to get back up).
Effects are Actor Components that get attached to the enemy blueprint, and their effect is then called through an interface.
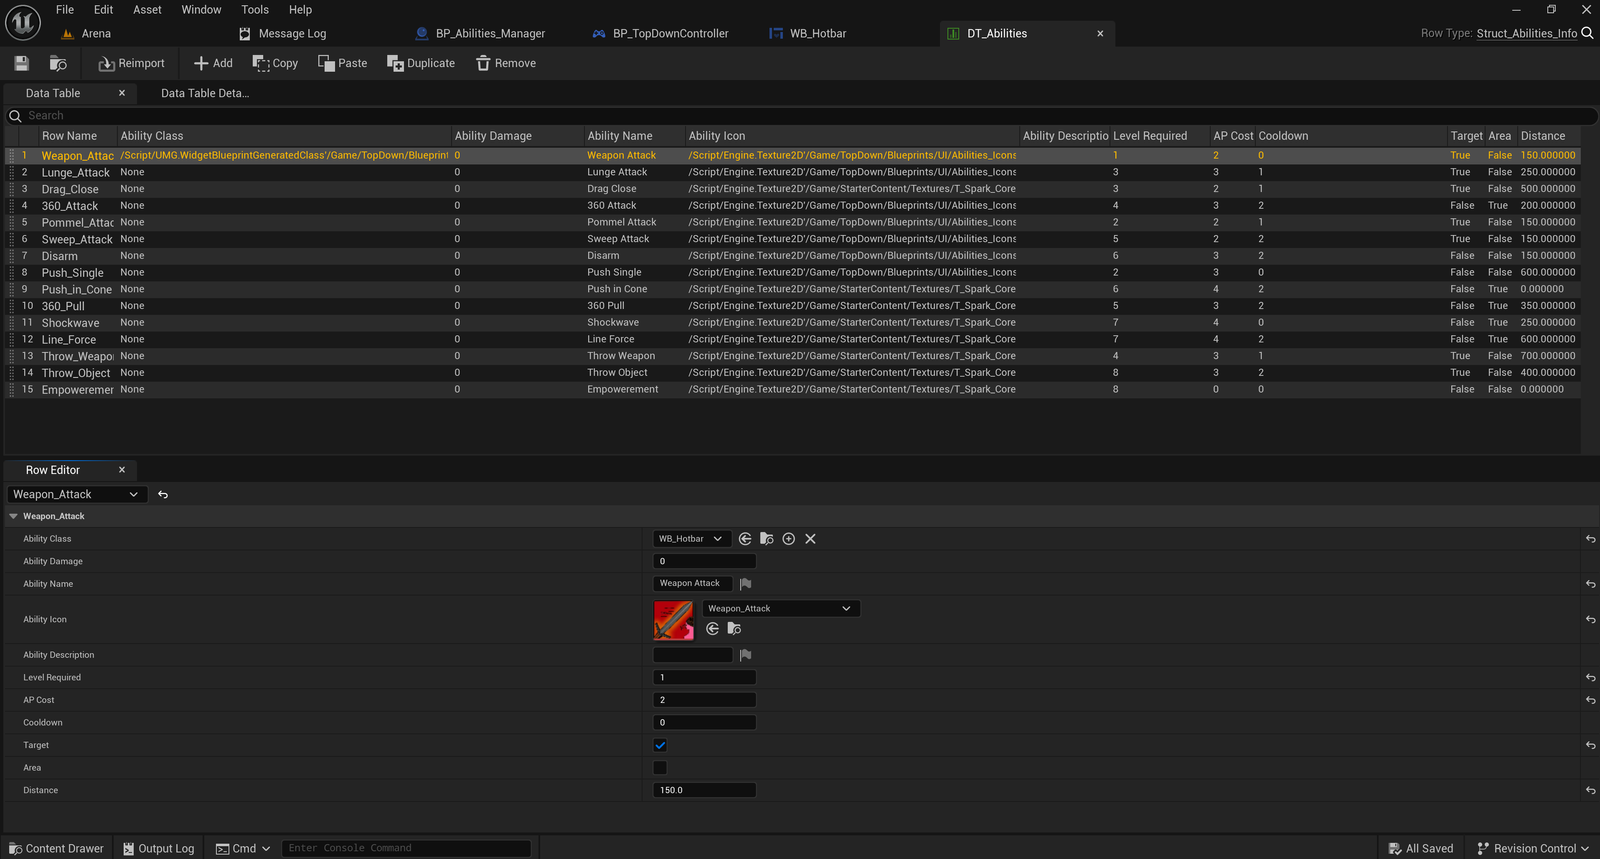
Abilities Implementation:
As creating a plethora of abilitties for the player was my main goal, I focused on making this process scalable.
I used a data table to store all abilities and their information (AP cost, cooldown, range); I then created an ability manager, which is a single blueprint where all ability effects are gathered as functions. To create a new ability, a new function for it must be created in this blueprint. Then, the ability is added to the corresponding Enumerator (Warrior or Telekinetic) and added to the OnClick function in the player controller. Once this is done, it will only need a button in the Hotbar Widget Blueprint that activates the ability when pressed.
To simplify even more the implementation of new abilities, most of them work similarly; in particular, all telekinetic abilities use the same function to move the enemy in a certain direction, so when creating a new ability that moves an object or an enemy, it will be sufficient to call that function that will take care of the enemy movement.
This function also checks if the enemy has fallen for a certain distance, and if that’s the case damages the enemy depending on how far it fell.
Telekinetic Movement blueprint:
Enemies:
To better showcase and test this class, I also created an AI that fights the player. There are 2 types of enemies in this demo, a melee fighter and a ranged one.
As this wasn’t the main point of the demo, I decided to simplify the AI and created a simple manager blueprint that takes care of enemies’ actions and keeps track of who has to play (which enemy or the player).
Enemies behavior blueprint:
Conclusions:
There is a lot more that could be shown for this project, but I preferred to keep it concise, going through the main aspects of the demo. Working on a similar project was extremely interesting, as I am strongly passionate about turn-based games; creating one was a challenge that felt incredibly satisfying, so much so that I couldn’t stop adding new features to make it as complete as possible. Working on this project strengthened my interest in designing and implementing complex systems, making it as scalable as possible so that adding new features can be intuitive and simple.
Inventory and Economic System
Overview:
This a System Design project made by myself in Unreal Engine 5.4, using Blueprints.
It’s composed of two Main Systems that work together to create an Inventory System and what I call an Economic System; both are very scalable so that either adding interactable objects to the world and purchasable objects to the Merchant is fairly easy.
The Inventory System functions as expected, allowing the Player to grab objects from the ground, drop and use them.
The Economic System, instead, is a Merchant System of my invention that aims at creating a more immersive experience, suitable mostly for RPGs where the Player can interact with the same Merchant multiple times in the same playthrough. With this System, instead of having the Merchant’s sellable objects update whenever the Player levels up (system used in most RPGs), this list will update every time the Merchant has a certain amount of gold, as if becoming richer allowed them to sell better objects; this means that as the Player interacts more and more with a certain Merchant, more objects that Merchant will be able to sell them, creating a more immersive experience where Player’s interactions with the world have actual consequences and make the Game World feel more alive. This could also be linked to other Systems, like a reputation one, making objects available to purchase depending on multiple factors.
Blueprints Explanation
Inventory System:
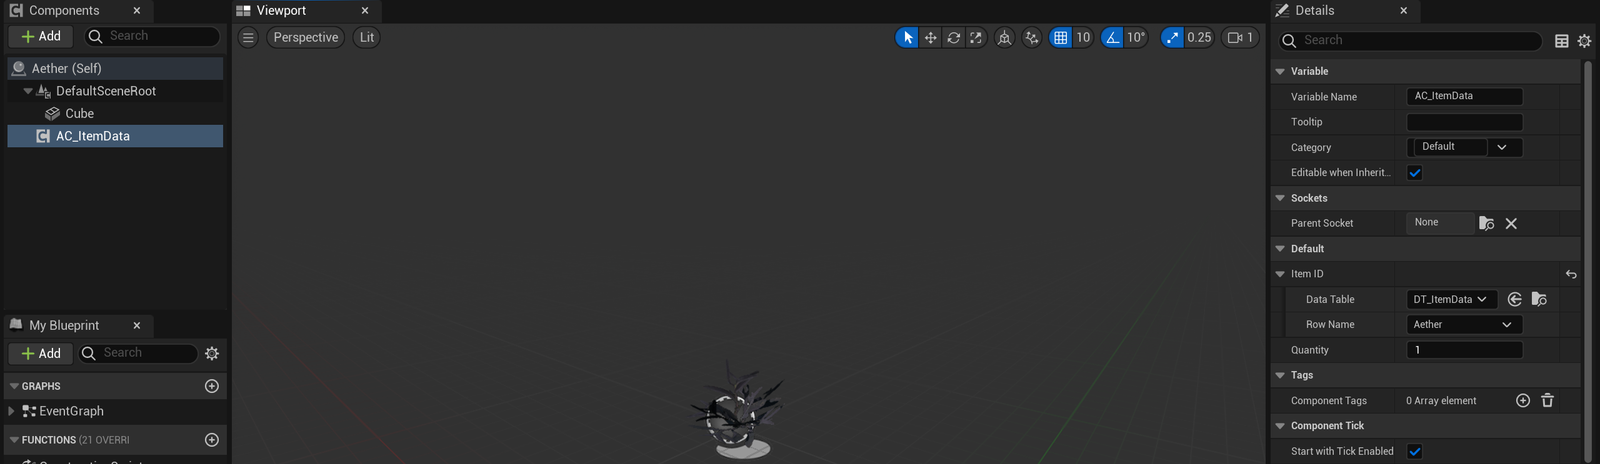
I started creating an Inventory System, using a Data Table to keep track of all the objects present in the world and their information. Each object has a specific Row Name that identifies all its information.
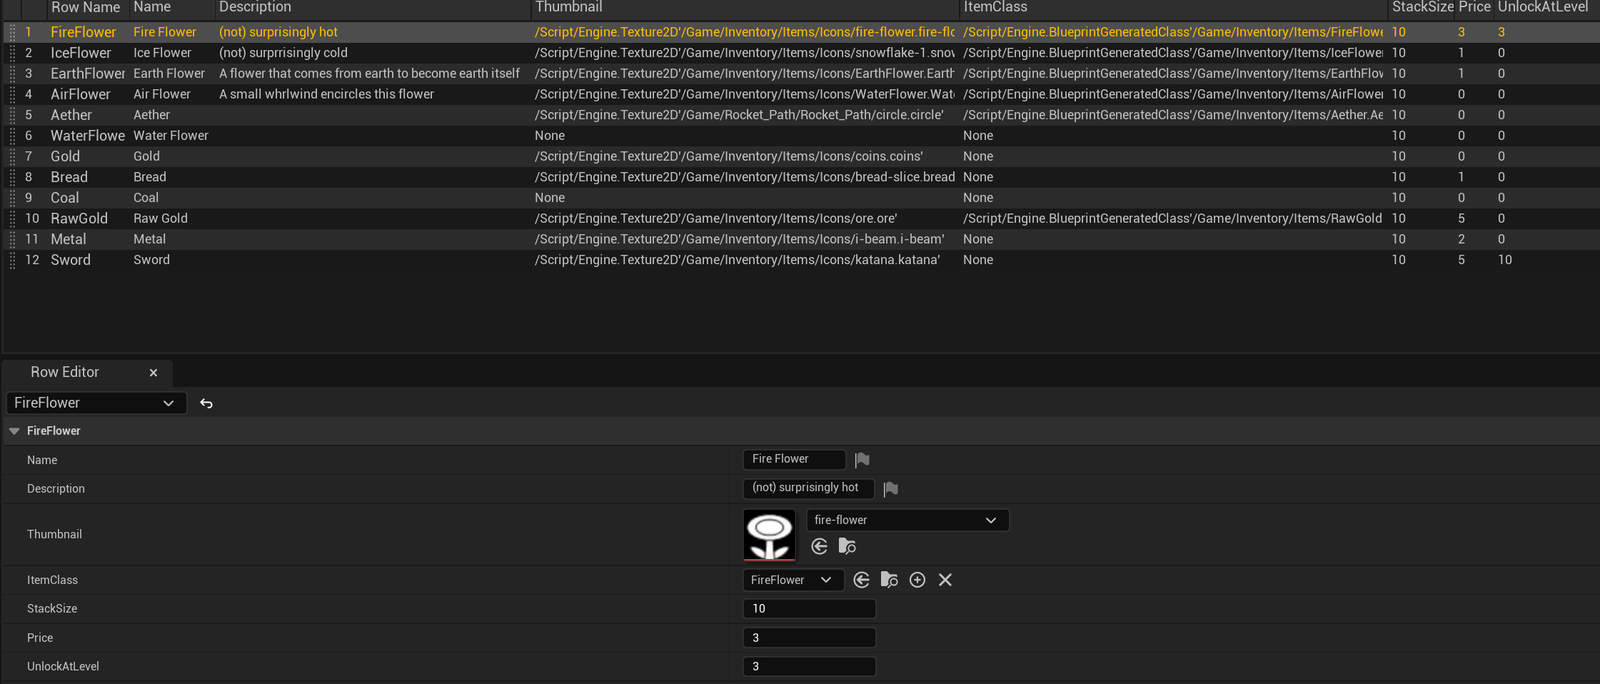
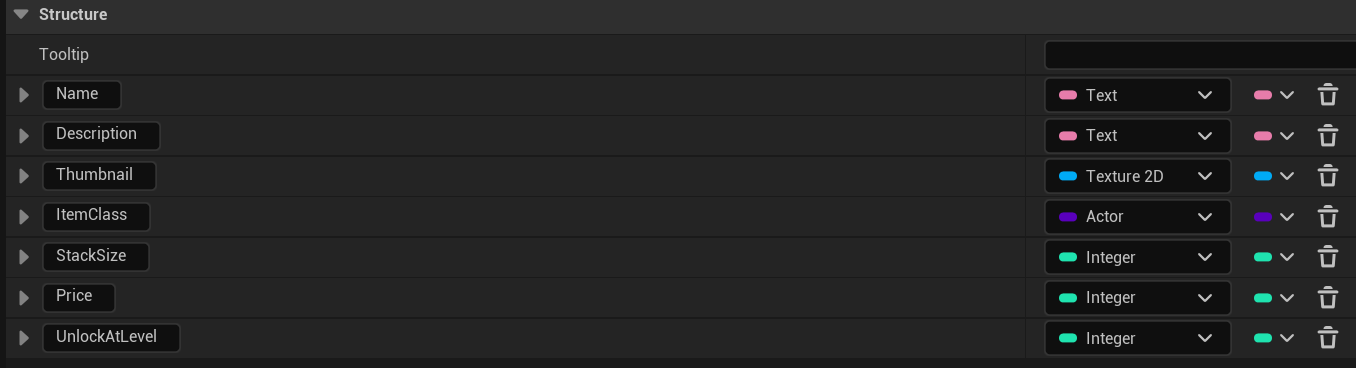
Thanks to this Data Table, to add a new object to the world is fairly easy as you will just need to add it here and then create an actor, add to it the “Ac_Item Data” Component in the viewport and assign to it the right object from the Data Table. once this is done the name of the object will appear when the player looks at it in the bottom of the screen and when picked up the right thumbnail will appear in the Inventory. I also use a Structure to keep track of the information I want to acquire about specific Items in other Blueprints.
When it comes to how this work in game, the component “Ac_Inventory System” has multiple functions that take care of actions such as grabbing objects from the ground, dropping them, showcasing a text with the name of the objects and finding the right slot where the gathered object has to end up in the Player’s Inventory.
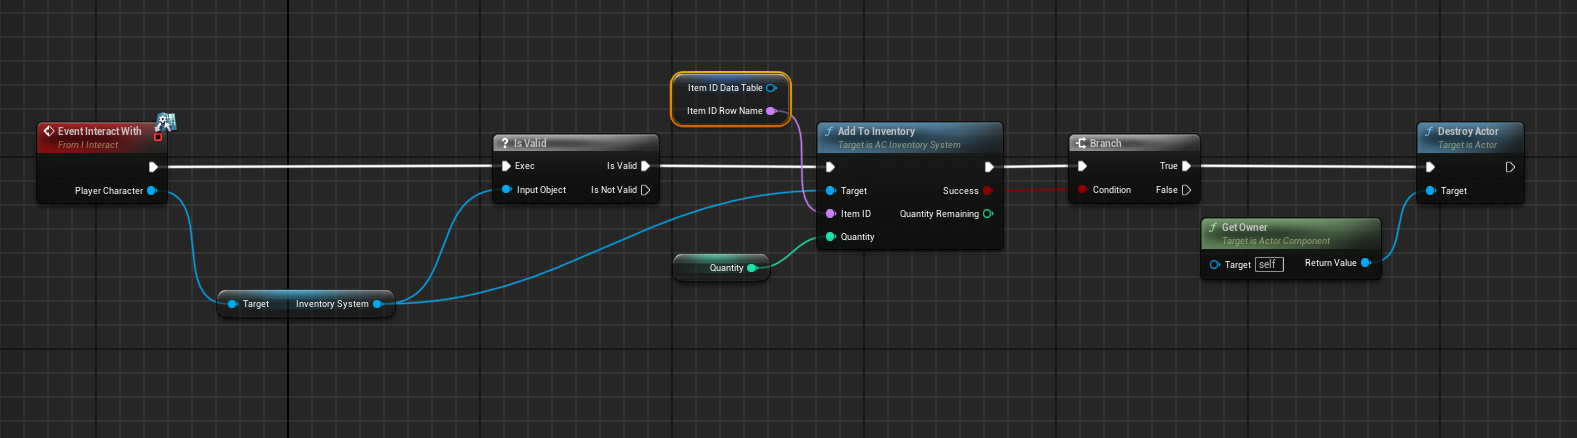
The most important function present in this component is “Add to inventory” as it is used to for the Economic System as well.
This function takes care of identifying what object the Player is interacting with and placing it in the Inventory.
The “AC_Inventory Component” has many more functions that take care of placing the object in the Inventory Slot etc., but there’s no need to showcase them here as they are shown in the gameplay video.
Economic System:
The Economic System aims at creating a scalable Merchant System that responds to Player interactions in a way that makes the Game World more immersive.
I started visualizing this System in Machinations.
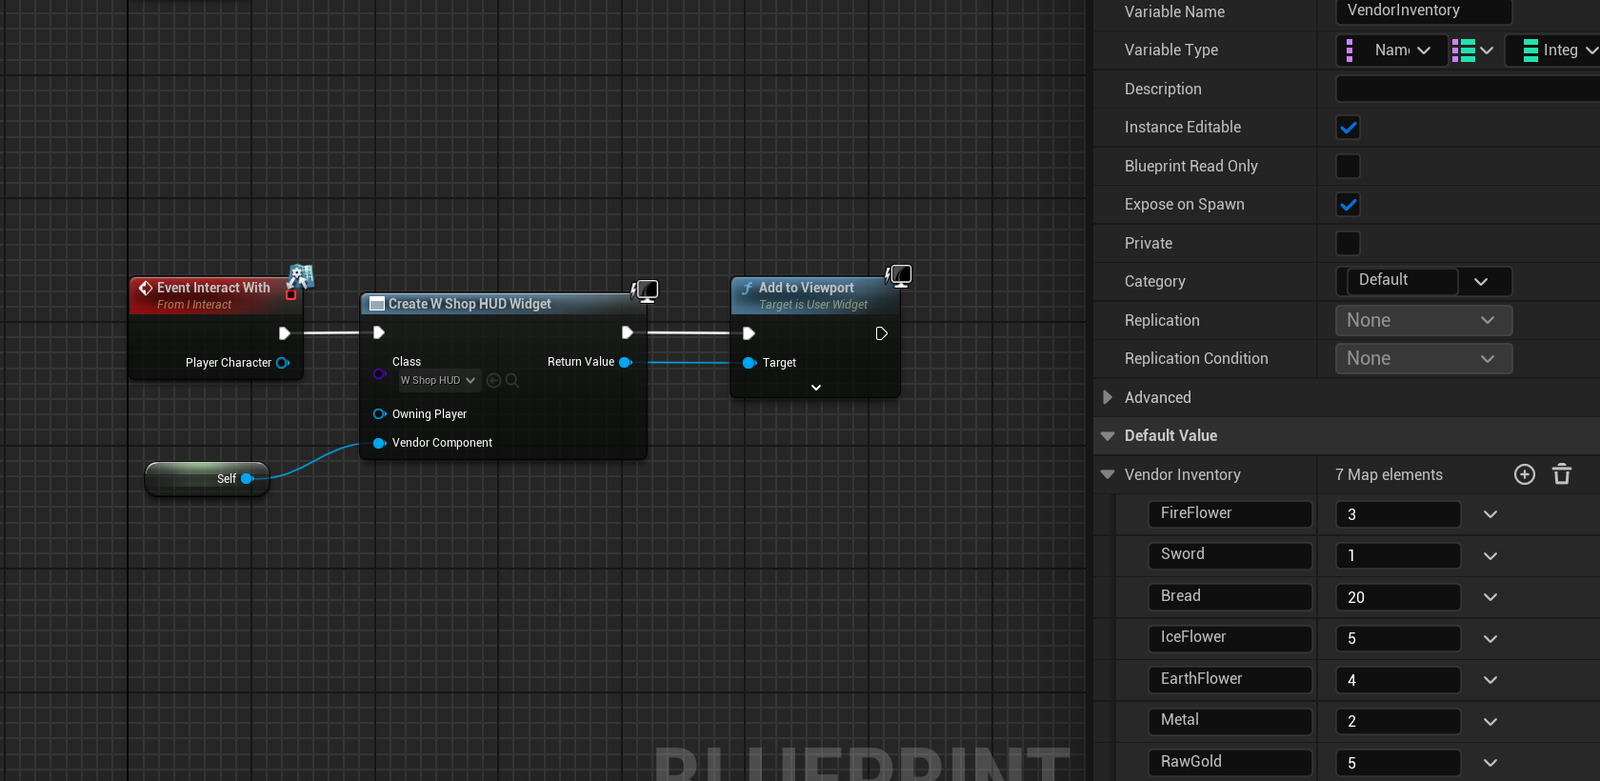
After planning the System in Machinations, I went into Unreal Engine to replicate it in Blueprints. I used a Map of Names, that have to be the same as the Row Names in the Data Table containing all the objects, so that a reference is created and all the information are the same, and Integers for the amount that the Merchant has. This makes for a very scalable System where, to add a new element to the Merchant Inventory, you just need to add a new element to the Map with the same Row Name found in the Data Table and the quantity that the Merchant owns (in the video min. 1.25 you’ll find a demonstration of this).
For the actual Interaction that allows the Player to buy items, each Item is allocated to a Slot, that is a UI Button, which when pressed shows a submenu that allows the player to buy the Item for a price, transferring the corresponding Player’s Money to Merchant’s Money and scaling down the quantity owned by the Merchant and moving that object to the Player’s Inventory.
When the Merchant’s Money are equal or more to a certain amount (identified buy the “Unlocked at Level” value present in the Data Table) that object appears in the Merchant’s Inventory on the next visit. The blueprint below shows how this happens.
The “Buying” function transfer the money from the Player to the Merchant and the object from the Merchant to the Player.
To check that the Merchant has enough of a certain object to sell it and that the Player has enough money to buy it, I use this function.
This function is used to recognize what Object the Player is trying to buy and to deplete the amount of that object owned by the Merchant once the purchase has happened.
Conclusions
These two Systems work together to create a profound Inventory and Economic System in a very scalable way.
Together with them there are two other Systems that I used to create some more depth to the whole thing: an Energy system, where the Player has a certain amount of Energy that gets depleted every time they gather an object from the ground, to simulate actions taken by the player. This energy can be replenished by buying Bread from the Merchant and then using it from the Inventory.
I also created a sort of Crafting System but right now it is not very scalable as it is just a button that when pressed checks if there are two specific objects in the inventory, and if they are there they get consumed to create Money for the Player to spend.
Overall creating this plethora of Systems was a great challenge that allowed me to get more into prototyping and System Design, learning a lot about Blueprints in Unreal.
I also enjoyed using Machinations to plan the Economic System and then replicating it in Unreal Engine.
Level Design
Cyberpunk Blockout
Overview:
During the Level Design course at FutureGames, we had a three-day full immersion lesson from Prashant Trivedi, Senior Level Designer at Massive Entertainment, on Level Design. After this, we had three weeks to use everything we learned and create a Level Blockout in Unreal Engine 5.
I worked with two other Game Designers to create a seamless Level set in a Cyberpunk-inspired Megabuilding. We came up with a quest that takes place in this megabuilding, where the player has to investigate on a cult that seemingly use this place as a headquarter.
The quest starts with the player having to meet with an informer that will give them a braindance containing more information about how this cult operates. Once the Braindance has been acquired, they will come back to their room in the same Megabuilding to watch it, but while doing so a blackout occurs causing the main character thoughts to fuse with those of the person that recorded the braindance. Following the information gained from the braindance the player will be able to reach the basement of the megabuilding where they will reach the site of a human sacrifice and uncover the cult operation.
My role:
I created the Blockout for the first section, visible in the video below from 00.00 to 4.30.
I also programmed the dialogue system in blueprints; I followed a tutorial that helped me create a system where the player has multiple choices.
I wrote all the dialogues present in this section, trying to replicate the feeling of the cyberpunk setting.
For the Level Blockout, I decided to create multiple possible ways of getting to the same room, trying to replicate the immersive-sim feeling of freedom where the player can get the same result through different routes; in this case, the player can get into the Bar either by overhearing the password from two guys next to the Bar itself and then giving the password to the security guy at the entrance or try a stealth approach crawling into a vent and getting in through a backdoor.
Metro Physis
Metro Physis is a puzzle game set in different subways, where the player uses a camera with “magic” filters to solve puzzles.
It is made in Unity, and physics-based. My role in this project was of Game and Puzzle Designer.
Stages of Development
Prototyping
I created a “Playground”, a new empty scene in Unity, where I experimented with multiple use cases for the powers.
Some examples of these experimentations are:


Through this process, I gathered Puzzle ideas that I later used in the levels.
Tutorialization
The tutorialization of the game happens diegetically, as part of the game experience.
New mechanics are presented to the player one by one, with increasingly more complex puzzles that test players’ understanding of the game mechanics before letting them progress.
Here the first Draft of Tutorial:
Here the powers were presented to the player in fast succession, and even if the puzzles presented were good, there wasn’t enough time for the player to get accustomed to a power before getting another one.
The current state of Metro Physis
From the previous Draft, I reworked the tutorial, creating a better-paced experience.
The tutorial is divided into three levels; for each level, two new mechanics are presented together with a couple puzzles that showcase how to use the new mechanics.
In the first level of the tutorial, the player starts without any powers, so that they can get accustomed to the commands, then teleport and push powers are introduced.
In the second level, the player has Push and Teleport powers, and during the level will acquire Minimize and Maximize. The puzzles in this level use Teleport and Push as “Helping Powers”, mostly making the puzzles less frustrating, while Minimize and Maximize have to be used to actually complete the puzzles so that the focus is on these newly acquired mechanics.
The third Level introduces Stop and Record Powers; as these are the most complex powers, I decided to have the puzzles introducing the powers to be pretty simple, and then to have a more complex puzzle to conclude the tutorials, where you have to use all the powers to find the solution.
The last level I created is called “Aristotle Tower”. This is a more advanced level where the player has access to all the powers and is presented with more complex puzzles; As it is set in a tower, I wanted to make the player feel the verticality of the level since the beginning. To do so, I decided to make the level start with a huge glass platform that enables the player to watch underneath and see the whole tower from above. There are multiple other occasions where the player can look up and down and realize how everything is connected and they’re moving downwards.